Friday, July 31

Report: All Reports and Tasks - Report Definition

All Reports and Tasks in the Tenant


I got requests from some people as how to access all the reports and tasks in the tenant. Here is the post which gives you the report definition to access all the reports, tasks and their related domains.

You need to know how to Create Custom Report to build a report and see the results.
         ðŸ‘‡ Click below to download the attachment 

                                               All Tasks and Reports - Report Definition


Thursday, July 30

General: How to turn off emails while testing in Non-Production Tenants?

While Testing in Non-Production turn off your emails


When you are testing in Non-Production Tenants like Sandbox, Implementations, be cautious and make sure you turn off your email notifications or route it to you,  else you would be spamming and creating unnecessary emails in your organization.

Testing represents, which ever changes / enhancements involves in sending email notifications to your Employees, Managers or any security groups.

Access the task - Edit Tenant Setup - Notifications to set up this restrictions.

Restrictions: 
1. Disable All Emails - No Emails will be generated.
2. Redirect All Emails to Contact - To a single contact in your tenant all the mails will be sent.
3. Redirect All Emails to Email Address - To a single emails address all the emails will be sent.

OMS Environment Selected for Restriction - Choose if you want to include / exclude any tenant here in this setup.


Wednesday, July 29

Integrations: XML to XSL Coding - Sample 2

XML to XSL Sample Coding - Having reference ID's


Here is another sample coding of xml to xsl. This highlights as how to handle some fields having reference ID related information especially you see this in Workday XML vs Simple XML.

Notice the highlighted Workday XML code for the field Gender. If you compare with other fields like Age or Employee_ID , this field (Gender) is showing up additional information like wd:type and so on. Understand that this is nothing but the object related information. Read this to understand more about reference ID's Reference ID's Explained

Workday XML Sample:


<?xml version="1.0" encoding="UTF-8"?>
<wd:Report_Data xmlns:wd="urn:com.workday.report/WD_Sample_Report">
  <wd:Report_Entry>
    <wd:Employee_ID>1234</wd:Employee_ID>
    <wd:firstName>Steve</wd:firstName>
    <wd:lastName>Morgan</wd:lastName>
<wd:Gender wd:Descriptor="Male">
<wd:ID wd:type="WID">98juht8074e54970962128e1105a</wd:ID>
<wd:ID wd:type="Gender_Code">Male</wd:ID>
</wd:Gender>
    <wd:Age>56</wd:Age>
  </wd:Report_Entry>
  <wd:Report_Entry>
    <wd:Employee_ID>1235</wd:Employee_ID>
    <wd:firstName>Logan</wd:firstName>
    <wd:lastName>McNeil</wd:lastName>
<wd:Gender wd:Descriptor="Female">
<wd:ID wd:type="WID">d3afbf8074e549709sdf362128e1</wd:ID>
<wd:ID wd:type="Gender_Code">Female</wd:ID>
</wd:Gender>
    <wd:Age>40</wd:Age>
  </wd:Report_Entry>
  <wd:Report_Entry>
    <wd:Employee_ID>1236</wd:Employee_ID>
    <wd:firstName>Joy</wd:firstName>
    <wd:lastName>Banks</wd:lastName>
<wd:Gender wd:Descriptor="Male">
<wd:ID wd:type="WID">e35sef8074e54970962128e1105a</wd:ID>
<wd:ID wd:type="Gender_Code">Male</wd:ID>
</wd:Gender>
    <wd:Age>42</wd:Age>
  </wd:Report_Entry>
</wd:Report_Data>

Use the Below highlighted code to access the information which is of type BO.

XSL Sample:


<?xml version="1.0" encoding="UTF-8"?>
<xsl:stylesheet xmlns:xsl="http://www.w3.org/1999/XSL/Transform"
   xmlns:wd="urn:com.workday.report/WD_Sample_Report" version="2.0">

<xsl:output method="text" indent="no"/>
<xsl:strip-space elements="*"/>

<xsl:variable name="NEWLINE" select="'&#xa;'"/>
<xsl:variable name="PIPE" select="'|'"/>

<xsl:template match="/">
    <!-- Header Record --> 
    <xsl:text>Employee ID</xsl:text>
        <xsl:value-of select="$PIPE"/>
<xsl:text>First Name</xsl:text>
        <xsl:value-of select="$PIPE"/>
<xsl:text>Last Name</xsl:text>
        <xsl:value-of select="$PIPE"/>
<xsl:text>Gender</xsl:text>
        <xsl:value-of select="$PIPE"/>
<xsl:text>Age</xsl:text>
<xsl:value-of select="$NEWLINE"/> 
<xsl:for-each select="wd:Report_Data/wd:Report_Entry">
    <!-- Detail Record --> 
        <xsl:value-of select="wd:Employee_ID"/>
                <xsl:value-of select="$PIPE"/>
    <xsl:value-of select="wd:firstName"/>
                <xsl:value-of select="$PIPE"/>
    <xsl:value-of select="wd:lastName"/>
        <xsl:value-of select="$PIPE"/>
    <xsl:value-of select="wd:Gender/@wd:Descriptor"/>
        <xsl:value-of select="$PIPE"/>
    <xsl:value-of select="wd:Age"/>
        <xsl:value-of select="$NEWLINE"/>
 </xsl:for-each>

    <!-- Trailer Record --> 
 <xsl:text>End of Records</xsl:text>
 
</xsl:template>
</xsl:stylesheet>

Test

Use XLS Transformer to test the above code.

Result:


Employee ID|First Name|Last Name|Gender|Age 1234|Steve|Morgan|Male|56 1235|Logan|McNeil|Female|40 1236|Joy|Banks|Male|42 End of Records

Additional Reads:


Tuesday, July 28

Business Processes: BP Critical Errors

How to identify Business Processes with Errors & Fix?


Some times we see few of the transactions falling flat, saying Processing Error! You can rely from time to time on one report i.e.

Business Process Exception Audit - Report

Using this report we can find all the BP's that have Critical Errors and Alerts. If you want to see and address your Warnings as well, check the Include Warnings Checkbox. But Warnings won't hard stop you. Your main target should be to zero any critical errors.

This is a great report to identify all critical errors at one place and fix it individually.


Once you run the report, it results like below.


Highlighted in Yellow
Severity                          : Critical / Warning
A Problem Exists With : Shows which step your BP has problem or as a whole.
Problem / Solution        : Provides you with possible solution to fix the same. Follow this, it will help you in fixing the issue mostly.

For Example: Click on one of the A Problem Exists With item which will take you the respective BP to fix as shown below. It gives you a clear detail as what is missing in this BP.


The related actions menu in the A Problem Exists With column is the same as the related actions menu on an individual step on the BP's View Definition page.

If a business process is broken, Workday automatically sends a Fix Business Process task to Business Process Administrators and provides a link to correct the business process definition.

Monday, July 27

Security: View User or task or Object Audit Trail - Report

View User (or) Task (or) Object - Audit Trail


This is a great report which comes into rescue when you want to view the changes made for a specific object or a task or for a particular user for a given time frame.

There is a possibility that some times you may not be able to see the changes captured in your Audit Trail of your Business Object.


If your duration on the parameters are lengthy, it may return an error message like below. 


Rely on Create Audit Log if you have a bulk transactions or lot of transactions to view. 

Additional Reads:


Sunday, July 26

Integrations: EIB with Email as Delivery method throws an error

EIB with Email as Delivery method throws an error - Fix


When you set the delivery method as Email for your Outbound and try to save it, it throws an error. To overcome this error, you have two ways

1. As demonstrated below with screenshots
2. By using Encryption for your generated file(Ex: PGP )


The Error pops up when you try to configure and save  your Delivery method with Email


Here is the workaround, if you don't want to set any encryption.  Click below with the navigation.

Enterprise Interface >> Toggle Approve Unencrypted Transport


Depending on the security that you have to approve, you can check the Approve checkbox and approve this.


Finally, you will not see the error but an alert to warn you that you are sending an email which could be outside of your company so be cautious about the data. You may consider Encrypting your data and send it.


This scenario is one among the mostly asked interview questions.

Saturday, July 25

Tasks & Reports: Workday Data Dictionary

 Workday Data Dictionary 


This is a standard report provided by Workday to identify the Delivered Fields for a given Business Object.


In Below example we have Dependent as the Business Object which returns the Field Names. Remember that this won't give all your fields that you have in your Business Object like calculated fields and other Related BO fields.

Also this lets you know how each field is secured with the Domain.


While creating condition rule, if you don't find a field you need, you can access the Workday Data Dictionary report to determine what fields are available for each business object.

You can also create a calculated field and bring it up to the Action Event level to access the field in condition rule.

Monday, July 20

Reporting: Alerts

Configure Alerts


You can setup alerts on your reports with the task - Configure Alert. Typically used when you want to notify the Birthday's, Anniversary's, Ending Contracts and Time Off's of the reportees under a Manager to that Manager.

Remember that through this you can alert people or security groups for the resultant report only(We call it Notification Topic ). You can schedule this to run on a recursive basis. 

Example: 

List of all Birthday's and Anniversary's in the upcoming month to the Manager, so that he/ she can prepare to send greetings.


Below is the sample configuration of an Alert for a test report. If there are any report parameters, you input it here.

Contd..

Under Recipients you can provide the security group / Manager to receive the notification. You can set up Subject and Body of the message here.

Related Tasks / Reports:

View Alerts (To view both Scheduled and Run Now Alerts)
Translate Alert Notifications

Sunday, July 12

Business Processes: Help Text

How to Set Help Text for the transactions for your users?


As the name suggests, this gives a preset text for the user to understand better about the process or transaction if you want them to know before they proceed. You notice these Help-Text in typical BP's say, Hire , Request Compensation Change, Close Position, Request Absence, so on..

Transaction Level View: Lets take an example of Request Compensation Change Process


You can maintain Help Text on each of your Business Process Step.

Navigation: 

Entire BP:  Business Process >> Actions >> Business Process >> Maintain Help Text
One Step in BP: Business Process Definition >> Go to a step >> Actions >> Business Process  >> Maintain Step Help Text


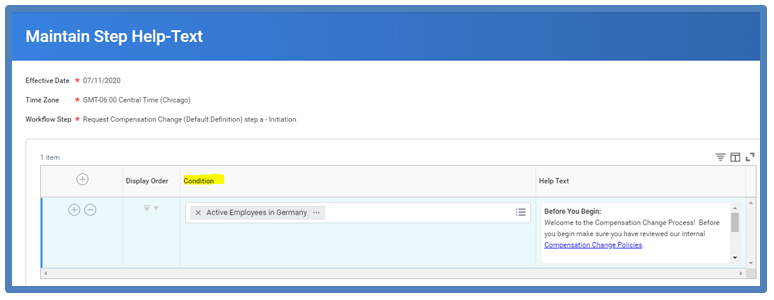
Edit Step Help Text


You can setup your step Help-Text on conditional basis, say if you want to show up the help text for a particular group of people.

Saturday, July 11

Tasks & Reports: Workday Usage Metrics Report

Workday Usage Metrics Report


Use this Standard report to access the metrics in your tenant like how many active / in active users using workday in mobile, laptop or iPad, password changes, how many are using the specific functional areas, report usages and so on. I just gave few metrics, but there are a lot of metrics that a security admin can go through to understand the health of the Tenant.

This report speaks and concentrates more about the volumes i.e # of users using a particular functional area or system.

This gives you the metrics for the asked month. if you are accessing this report current month, provide the metric date as previous month.


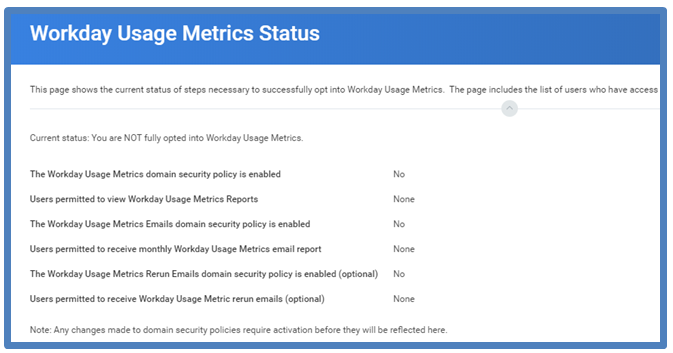
Workday Usage Metrics Status


Other reports you can check out related to Metrics and usage:

Workday Usage Trends Report
View Workday Usage Metric Details
Workday System Usage
Workday System Status

Friday, July 3

Business Processes: All types of Conditions Explained

Business Process Conditions


There are 5 different types of conditions that you will come across while working on Business Processes.

1. Validation Conditions
2. Entry Conditions
3. Workday Owned Entry Conditions
4. While Running Conditions
5. Exit Conditions.


Validation Conditions:  [ If ALL conditions are False, the step will exit and the process will continue ]

These type of conditions help you in validating the field values on you tasks. Widely used in Initiation step of BP.  Few action steps also allow this, but not all.

Example: Your condition Rule could be like 
1. Hire Date is Blank (Critical)
2. Zip code is Required  (Critical)
3. Employee Middle name missing (Alert)

Lets say in Hire BP, if you added the above three conditions for validation in the initiation step(a) of your BP, then All the three conditions should be false in order to proceed further. 

Where do I see these Validations? - When you are hiring an Employee, at the time of data entry say, you missed entering Hire date and try to save or submit. This is where your validation is fired. Till the time you fix this you can't Submit it. Relate this to the 1st condition in example quoted above. 

So you need to provide the desired values in order to make your condition False. Unless all your conditions are False, your BP will not go on to the next step or in other words Unless you fix all your errors you can't submit the process.

Severity:
You can set the severity of your condition by setting any of the below.
Critical  - Throws error, waits for you to fix the error.
Warning - Throws alert, will not wait for you to fix the alert.

You can Configure Validation Message on your Condition. (Navigation: Business Process Condition >> Validation >> Configure Validation Message )

Entry Conditions:  [ If All conditions are true, the step will be entered ]

Except your Initiation Step, you can use the Entry Conditions on any type of step

As the name suggests, the Entry Conditions are used to set the conditions as when to enter the step. If the condition that you set is true then it is going to enter the step otherwise it will be skipped. (During the progress of your BP you will typically see as Not Required if your condition failed.)

Example: Your condition Rule could be
1. Country is not Canada?
2. Worker has Workday Account? 

Lets say you set the entry condition 1 shown in above example on your Step c, if the proposed country is USA then it enters the Step c, and if the proposed country is Canada then it will skip Step c and moves to Step d.

Workday Owned Entry Conditions:  [ If All conditions are true, the step will be entered ]

These conditions are same as your Entry Conditions, but these are owned by Workday. You can not edit these conditions if you come across in some of the Action steps

If you have Workday Owned Entry Conditions, you can add your own Entry Conditions to the step. Both Entry type conditions should be true in order to enter the step.

All the conditions should be true in order to enter the step. 

While Running Conditions:  [ If All conditions are true, the approval chain step will be routed ]

While Running Conditions are applicable only for Approval Chain step. This is just like an entry condition for each of the approver in the approval chain. 

Example: 
Lets assume, Your organization approval chain for an employee looks some thing like below. Notice 4 levels of approvals in this approval chain. Manager B is manager of Worker A, and Manager C is manger of Worker B and so on.

Worker A --> Reports to Manager B --> Reports to Manager C --> Reports to Manager D --> Reports to Manager E

It compares the next approver to some value, and if the condition is true, the step is routed to that approver. If the condition is false, it skips the current approver and moves on to evaluate the next approver in the chain.

Exit Conditions:  [ If All conditions are true, the approval chain may exit ]

Exit Conditions are applicable only for Approval Chain and Integration steps.

This conditions are used when to stop or when to exit the chain. 

Example: Condition 
Lets assume, Your organization approval chain for an employee looks some thing like below. Notice 6 levels of approvals in this approval chain. Manager B is manager of Worker A, and Manager C is manger of Worker B and so on.

Worker A --> Reports to Manager B --> Reports to Manager C --> Reports to Manager D --> Reports to Manager E --> Reports to Manager F  --> Reports to Manager G

Condition Examples: (Until)
Management Level = VP ?
Management Level > 4 ?
 
Your conditions rely mostly on Management Level field. In above condition Management Level > 4 when the approval chain reaches Management Level 5 then it exits.

The exit conditions say at which level you want to exit the chain. The exit condition works while the chain is running, when the condition is met, the Exit condition exits the step.

For Integration step the exit conditions are used to test the response from the external service before the step can exit.